fastlane是为iOS和Android应用程序自动执行beta部署和发布的最简单方法。它处理所有繁琐的任务,例如生成屏幕截图,处理代码签名和发布应用程序。
基本使用
安装fastlane
-
安装最新的Xcode命令行工具
xcode-select --install -
安装fastlane(可以使用RubyGems或Homebrew安装)
 # Using RubyGems
 sudo gem install fastlane -NV

 # Alternatively using Homebrew
 brew cask install fastlane
初始化fastlane
在Shell中,切换到项目目录并运行
fastlane init
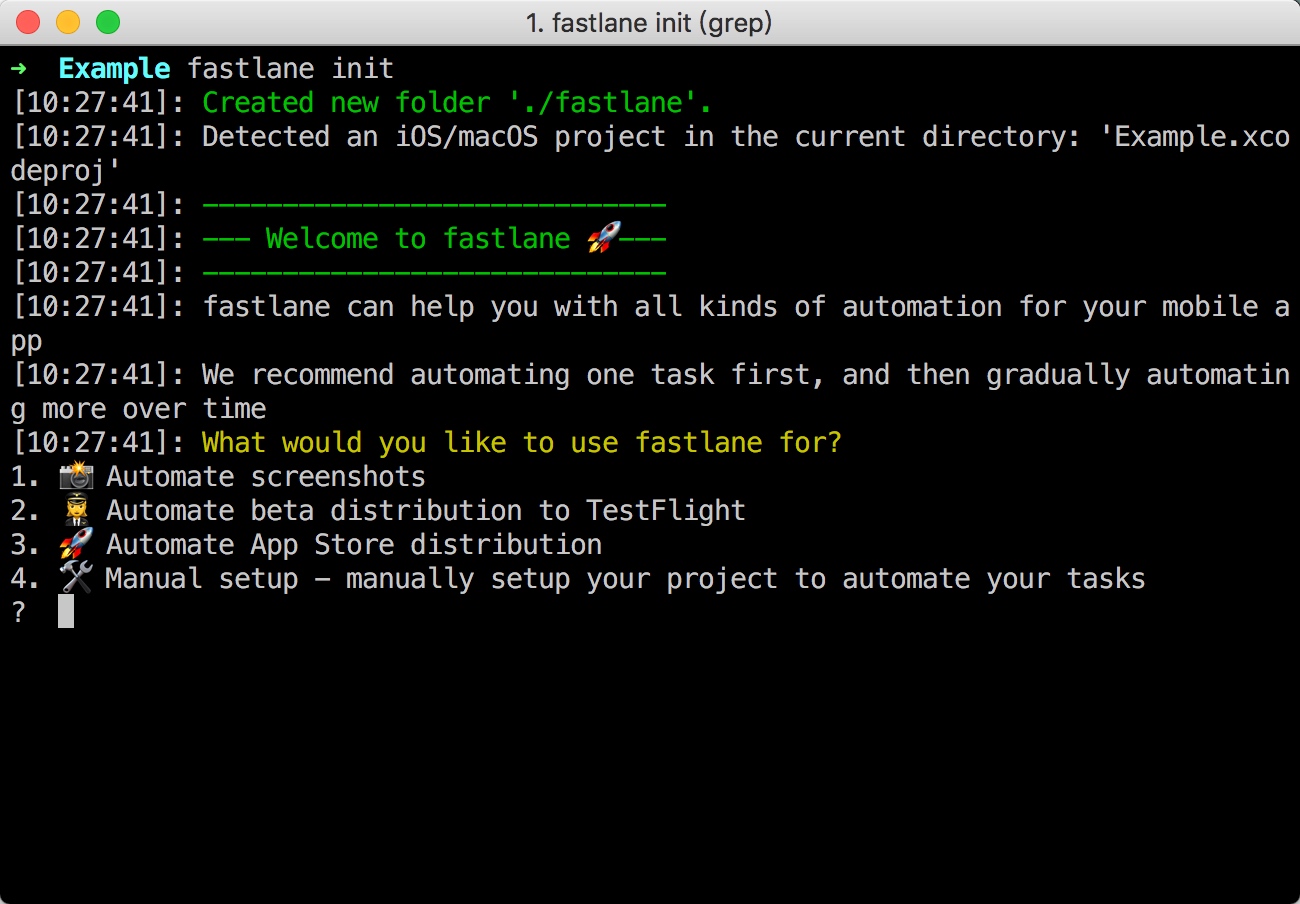
fastlane提供了几种默认的配置,可以根据实际需求选择,期间可能会要求输入一些配置信息,根据提示输入即可。
根据你选择的配置,会生成不同的配置文件。
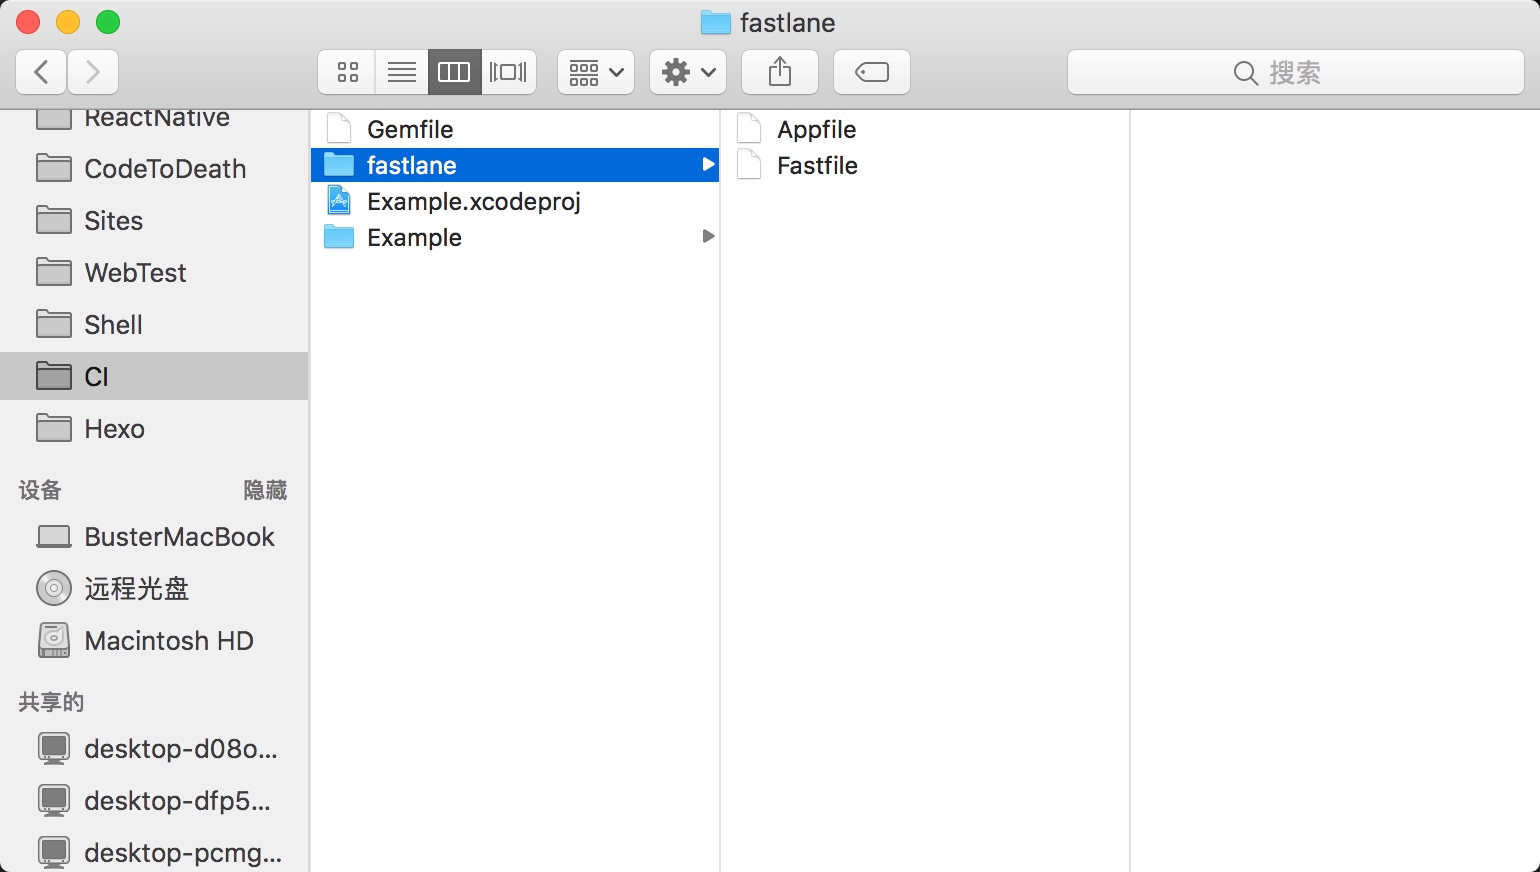
fastlane/Fastfile包含了发布应用程序所需的所有信息。fastlane/Appfile包含了fastlane工具中使用的基本配置信息(如Apple ID、Bundle identifier等),这些信息可以让你更快地部署lane。更多./Gemfile存储了fastlane所需的依赖条件。更多
使用fastlane发布iOS App
一个App的发布流程,大致分为代码签名、应用构建、发布几个步骤,以下将详细介绍每个步骤
初识lane
Fastlane文件中默认配置:
default_platform(:ios)

platform :ios do
  desc "Description of what the lane does"
  lane :custom_lane do
    # do something
  end
end
- 每个
lane即一个流程,可在这里配置例如Beta部署或发布App Store的操作。 platform表示lane所运行的平台
在lane中,我们可以使用fastlane创建的action,或者第三方的插件来实现我们所需要的操作。
在Shell中切换到项目根目录,使用以下方法执行lane:
fastlane custom_lane
代码签名
如果你不熟悉代码前面,请查看Xcode代码签名基础知识的WWDC
这里使用的action均为自动设置代码签名,如果你已经手动设置好了,且不需要fastlane为你做此项配置,可直接跳到下一步骤。
match
通过使用match,可以将私钥和证书存储在Git仓库中,以便跨机器同步它们。
match(git_url: "https://github.com/fastlane/certificates",
      type: "adhoc",
      app_identifier: "tools.fastlane.app")
关于match的配置方法,我单独写了一篇文章介绍,推荐使用这种方法。使用match同步证书和配置文件
注意:match会要求您撤销现有证书
cert和sigh
如果你不想撤销现有证书,但仍想使用自动设置,则可以使用cert和sigh。
cert将确保你在本地计算机上安装了有效的证书及其私钥sigh将确保你在本地安装了与证书相匹配的有效配置文件
lane: beta do
    cert
    sigh(force: true)
force: true将确保每次运行时重新生成配置文件。
cert
cert将检查本地计算机上是否安装了任何可用的签名证书。
fastlane cert
只有在需要创建新证书的时候,cert才会
- 创建一个新的私钥
- 创建新的签名请求
- 生成、下载和安装证书
- 将所有生成的文件导入到Keychain中
cert永远不会撤销你现有的证书。如果无法再创建证书,则cert将引发异常,这意味着你必须撤销其中一个现有证书来为新证书腾出空间。
设置Apple ID
fastlane cert -u [email protected]
在lane中使用
cert(
    development: true,
    username: "[email protected]"
)
注意:cert无法从Apple Developer Portal下载现有证书+私钥,因为私钥永远不会离开你的计算机。
sigh
sigh执行的文件操作
sigh将默认为App Store创建、修复和下载配置文件。
fastlane sigh --appstore  # default
fastlane sigh --adhoc
fastlane sigh --development
设置标识符和用户名:
fastlane sigh -a com.krausefx.app -u username
在lane中使用
lane: beta do
    sigh(
        adhoc: true,
        force: true,
        filename: "myFile.mobileprovision"
    )
注意:sigh永远不会触及或使用由Xcode创建和管理的配置文件。相反,sigh将管理自己的一组配置文件。
sigh将访问iOS Dev Center下载,续订或生成.mobileprovision文件。它使用Spaceship与Apple的Web服务进行通信。
构建应用
使用gym来构建和打包iOS App,它可以处理繁重的工作,并且轻松生成签名ipa和app文件
基础用法
使用gym
fastlane gym
设置参数进行构建
fastlane gym --workspace "Example.xcworkspace" --scheme "AppName" --clean
如果您需要使用其他Xcode安装,请使用xcode-select或定义DEVELOPER_DIR:
DEVELOPER_DIR="/Applications/Xcode6.2.app" fastlane gym
如果需要上传到App Store或TestFlight,设置gym的导出方法:
fastlane gym --export_method ad-hoc
传递布尔参数
fastlane gym --include_bitcode true --include_symbols false
需要xcodebuild原始日志信息,打开~/Library/Logs/gym
自动化构建流程
在lane中使用gym
lane :beta do
  scan
  gym(scheme: "MyApp")
  crashlytics
end

# error block is executed when a error occurs
error do |lane, exception|
  slack(
    # message with short human friendly message
    message: exception.to_s,
    success: false,
    # Output containing extended log output
    payload: { "Output" => exception.error_info.to_s }
  )
end
当gym引发错误时,error_info属性将包含进程输出,让你可以在第三方工具(如Slack)中显示错误。
然后,你可以轻松地公测提供商之间进行切换(例如testflight,hockey,s3和更多)。
上传应用到分发平台
构建应用程序后,就可以将它上传到你选择的Beta测试服务中。fastlane的优雅之处在于你可以轻松地切换测试提供商,甚至可以一次上传到多个测试提供商,没有任何额外的工作。
你所要做的就是在使用gym构建应用程序后,将你选择的Beta测试提供程序添加到lane中:
lane :beta do
  match(type: "appstore")    # see code signing guide for more information
  gym(scheme: "MyApp")
  pilot
  slack(message: "Successfully distributed a new beta build")
end
fastlane会自动将生成的.ipa文件的信息从gym传递给你选择的Beta测试提供程序。
以下只列举几种常见的Beta测试服务,有关其他受支持的Beta测试服务的更多信息,请参阅“Beta”操作列表
TestFlight
你可以使用fastlane轻松地将新版本上传到TestFlight(它是App Store Connect的一部分)。为此,只需testflight在构建应用程序后使用内置操作即可
lane :beta do
  # ...
  gym
  pilot
end
一些示例用例
lane :beta do
  # ...
  gym

  # Variant 1: Provide a changelog to your build
  pilot(changelog: "Add rocket emoji")

  # Variant 2: Skip the "Waiting for processing" of the binary
  #   While this will speed up your build, it will not distribute
  #   the binary to your tests, nor set a changelog
  pilot(skip_waiting_for_build_processing: true)
end
如果你曾经fastlane init设置过fastlane,那么你的Apple ID将存储在fastlane/Appfile。你也可以使用覆盖用户名pilot(username: "[email protected]")。
使用fastlane,你还可以自动管理你的Beta版测试人员,查看其他可用操作。
Crashlytics (Fabric Beta)
lane :beta do
  # ...
  gym
  crashlytics(api_token: "[insert_key_here]",
              build_secret: "[insert_key_here]")
end
要获取API令牌,请打开组织设置页面,然后单击API密钥并构建机密链接。
fir.im
lane :beta do
    gym
    firim(firim_api_token: "427899702537eaadc5104ecbf5096d5c"
      )
end
蒲公英
lane :beta do
    gym
    pgyer(api_key: "7f15xxxxxxxxxxxxxxxxxx141",
    user_key: "4a5bcxxxxxxxxxxxxxxx3a9e"
    )
end
提交应用到App Store
构建应用程序后,就可以使用deliver上传到App Store了
lane: release do
    match(type: "appstore")  # see code signing guide for more information
    gym(scheme: "MyApp")
    deliver                  # upload your app to App Store Connect
    slack(message: "Successfully uploaded a new App Store build")
end
设置参数调用
deliver(
  submit_for_review: true,
  force: true,
  metadata_path: "./metadata"
)
扩展使用
插件
fastlane的插件系统是官方支持用户开发的开放平台,你可以根据你的需求自定义开发不同的插件,并在fastlane中使用。
寻找一个插件
列出所有可用的插件
fastlane search_plugins
搜索特定的插件
fastlane search_plugins [query]
在项目中添加插件
fastlane add_plugin [name]
运行此命令后,fastlane会帮你对项目进行设置以开始使用插件:
- 添加插件配置文件
fastlane/Pluginfile - 确保
fastlane/Pluginfile的身份正确引用./Gemfile - 运行
fastlane install_plugins以确保在本地计算机上安装了所有必需的依赖项(此步骤可能会要求你输入管理员密码以安装Ruby gem) - 你将有3个新文件,这些文件都应该添加到版本控制中:
Gemfile,Gemfile.lock和fastlane/Pluginfile
在新机器上同步插件
要确保所有插件都安装在本地计算机上,请运行:
fastlane install_plugins
删除插件
打开fastlane/Pluginfile文件,并删除文件中像这样的配置项:
gem "fastlane-plugin-[plugin_name]"
Appfile
Appfile必须存储在./fastlane目录中。
默认情况下的Appfile:
app_identifier "net.sunapps.1" # The bundle identifier of your app
apple_id "[email protected]"  # Your Apple email address

# You can uncomment the lines below and add your own
# team selection in case you're in multiple teams
# team_name "Felix Krause"
# team_id "Q2CBPJ58CA"

# To select a team for App Store Connect use
# itc_team_name "Company Name"
# itc_team_id "18742801"
如果你的App Store Connect和Apple Developer账号不相同,使用以下代码配置:
app_identifier "tools.fastlane.app"       # The bundle identifier of your app

apple_dev_portal_id "[email protected]"  # Apple Developer Account
itunes_connect_id "[email protected]"     # App Store Connect Account

team_id "Q2CBPJ58CA" # Developer Portal Team ID
itc_team_id "18742801" # App Store Connect Team ID
如果你的项目每个环境都具有不同的包标识符(即beta,app store),则可以使用for_platform和/或for_lane块声明来定义它。
app_identifier "net.sunapps.1"
apple_id "[email protected]"
team_id "Q2CBPJ58CC"

for_platform :ios do
  team_id '123' # for all iOS related things
  for_lane :test do
    app_identifier 'com.app.test'
  end
end
在fastlane中使用Appfile中的配置
在Fastfile中访问这些配置
identifier = CredentialsManager::AppfileConfig.try_fetch_value(:app_identifier)
team_id = CredentialsManager::AppfileConfig.try_fetch_value(:team_id)
使用Gemfile进行依赖管理
Gemfile明确定义使用的fastlane版本和依赖关系,并且能让fastlane使用更迅速。
-
在项目的根目录创建一个
Gemfile文件source "https://rubygems.org" gem "fastlane" - 运行
sudo bundle update同时添加./Gemfile和./Gemfile.lock版本控制文件 - 每次运行fastlane时,请使用
bundle exec fastlane [lane] - 在CI上,添加
sudo bundle install作为第一个构建步骤 - 要更新fastlane,请运行
sudo bundle update fastlane
pem推送证书
pem执行的文件操作
fastlane pem
命令会执行如下操作:
- 创建新的签名请求
- 创建新的推送认证
- 下载证书
.pem在当前工作目录中生成一个新文件,你可以将其上传到服务器
请注意,pem永远不会撤销你现有的证书。pem无法下载任何现有的推送证书,因为私钥仅在其创建的计算机上可用。
如果你已启用推送证书,该证书至少有30天有效,则pem不会创建新证书。如果你仍想创建一个,请使用force:
fastlane pem --force
你可以传递这样的参数:
fastlane pem -a com.krausefx.app -u username
如果要生成开发证书,请执行以下操作:
fastlane pem --development
为你的p12文件设置密码:
fastlane pem -p "MyPass"
你可以为输出文件指定名称:
fastlane pem -o my.pem
在lane中使用
pem(
  force: true, # create a new profile, even if the old one is still valid
  app_identifier: "net.sunapps.9", # optional app identifier,
  save_private_key: true,
  new_profile: proc do |profile_path| # this block gets called when a new profile was generated
    puts profile_path # the absolute path to the new PEM file
    # insert the code to upload the PEM file to the server
  end
)
增加内部版本号
在TestFlight和App Store中,每次上传新版本时都必须增加内部版本号。
Beta内部版本号
下面的代码示例将使用TestFlight中的最新版本号并临时设置它。
lane :beta do
  increment_build_number(
    build_number: latest_testflight_build_number + 1,
    xcodeproj: "Example.xcodeproj"
  )
end
将构建号提交给版本控制
lane :beta do
  # Ensure that your git status is not dirty
  ensure_git_status_clean

  # Increment the build number (not the version number)
  # Providing the xcodeproj is optional
  increment_build_number(xcodeproj: "Example.xcodeproj")

  # Commit the version bump
  commit_version_bump(xcodeproj: "Example.xcodeproj")

  # Add a git tag for this build. This will automatically
  # use an appropriate git tag name
  add_git_tag

  # Push the new commit and tag back to your git remote
  push_to_git_remote
end
App Store内部版本号
下面的代码示例将使用App Store Connect中的最新版本号并临时设置它。
lane :beta do
  increment_build_number(
    build_number: app_store_build_number + 1,
    xcodeproj: "Example.xcodeproj"
  )
end
第三方Beta测试服务
如果你不是使用TestFlight作为测试服务,则需要管理已注册的设备及其UDID。fastlane已经支持设备注册和更新配置文件。
lane :beta do
  # Before calling match, we make sure all our devices are registered on the Apple Developer Portal
  register_devices(devices_file: "devices.txt")

  # After registering the new devices, we'll make sure to update the provisioning profile if necessary
  # Note how we make sure to pass "adhoc" to get and use a provisioning profile for Ad Hoc distribution
  sync_code_signing(force_for_new_devices: true, type: "adhoc")
  build_app
  # ...
end
devices.txt应该是这样的:
Device ID Device Name
A123456789012345678901234567890123456789  DeviceName1
B123456789012345678901234567890123456789  DeviceName2
参数表
cert参数
| 键 | 描述 | 默认值 |
|---|---|---|
| development | 创建开发证书而不是分发证书 | false |
| force | 即使存在现有证书,也要创建证书 | false |
| username | 您的Apple ID用户名 | * |
| team_id | 如果您在多个团队中,您的Developer Portal团队的ID | * |
| team_name | 如果您在多个团队中,您的Developer Portal团队的名称 | * |
| filename | 要存储的证书的文件名 | |
| output_path | 应存储所有证书和私钥的目录的路径 | . |
| keychain_path | 自定义钥匙串的路径 | * |
| keychain_password | 首次访问新mac上的证书时可能需要这样做。对于登录/默认钥匙串,这是您的帐户密码 | |
| platform | 设置配置文件的平台(ios,macos) | ios |
sigh参数
| 键 | 描述 | 默认值 |
|---|---|---|
| adhoc | 设置此标志将生成AdHoc配置文件而不是App Store配置文件 | false |
| development | 更新开发证书而不是生产证书 | false |
| skip_install | 默认情况下,证书将添加到本地计算机。设置此标志将跳过此操作 | false |
| force | 无论状态如何,都可以续订配置文件 - 自动为临时配置文件添加所有设备 | false |
| app_identifier | 您应用的捆绑包标识符 | * |
| username | 您的Apple ID用户名 | * |
| team_id | 如果您在多个团队中,您的Developer Portal团队的ID | * |
| team_name | 如果您在多个团队中,您的Developer Portal团队的名称 | * |
| provisioning_name | Apple Developer Portal上使用的配置文件的名称 | |
| ignore_profiles_with_different_name | 与:provisioning_name结合使用 - 当为true时,仅下载与此确切名称匹配的配置文件 | false |
| output_path | 应存储配置文件的目录 | . |
| cert_id | 要使用的代码签名证书的ID(例如78ADL6LVAA) | |
| cert_owner_name | 用于新配置文件或续订的证书名称。(例如“Felix Krause”) | |
| filename | 用于生成的配置文件的文件名(必须包含.mobileprovision) | |
| skip_fetch_profiles | 跳过现有配置文件的验证,如果您有数千个配置文件,这将非常有用 | false |
| skip_certificate_verification | 跳过每个现有配置文件的证书验证。这将确保可以在本地计算机上使用配置文件 | false |
| platform | 设置配置文件的平台(即ios,tvos) | ios |
| readonly | 仅获取现有配置文件,不生成新配置文件 | false |
| template_name | 配置文件模板的名称。如果开发者帐户具有配置配置文件模板(又名:自定义权利),则可以通过在创建/编辑配置文件时检查权利下拉列表来找到模板名称(例如“Apple Pay Pass Suppression Development”) |
gym参数
| 键 | 描述 | 默认值 |
|---|---|---|
| workspace | 工作区文件的路径 | |
| project | 项目文件的路径 | |
| scheme | 该项目的scheme。确保它标记为Shared | |
| clean | 项目在建造之前是否应该进行Clean? | false |
| output_directory | 应存储ipa文件的目录 | . |
| output_name | 生成的ipa文件的名称 | |
| configuration | 构建应用程序时使用的配置。默认为’Release’ | * |
| silent | 隐藏构建时不必要的所有信息 | false |
| codesigning_identity | 要使用的代码签名标识的名称。它必须与名称完全匹配。例如’iPhone Distribution:SunApps GmbH’ | |
| skip_package_ipa | 我们应该跳过包装ipa吗? | false |
| include_symbols | ipa文件应该包含符号吗? | |
| include_bitcode | ipa文件应该包含bitcode吗? | |
| export_method | 用于导出存档的方法。有效值包括:app-store,ad-hoc,package,enterprise,development,developer-id | |
| export_options | 导出选项plist的路径或带导出选项的哈希。使用’xcodebuild -help’打印全套可用选项 | |
| export_xcargs | 将附加参数传递给xcodebuild以获取包阶段。请务必引用设置名称和值,例如OTHER_LDFLAGS =“ - ObjC -lstdc ++” | |
| skip_build_archive | 从以前构建的xarchive导出ipa。使用archive_path作为源 | |
| skip_archive | 构建之后,不要归档,实际上不包括-archivePath参数 | |
| build_path | 存档应存储在的目录 | |
| archive_path | 创建存档的路径 | |
| derived_data_path | 构建产品和其他派生数据的目录 | |
| result_bundle | 是否应在输出目录中生成Xcode结果包 | false |
| buildlog_path | 存储构建日志的目录 | * |
| sdk | 应该用于构建应用程序的SDK | |
| toolchain | 应该用于构建应用程序的工具链(例如com.apple.dt.toolchain.Swift_2_3,org.swift.30p620160816a) | |
| destination | 使用自定义目标构建应用程序 | |
| export_team_id | 可选:有时您需要在导出ipa文件时指定团队ID | |
| xcargs | 将其他参数传递给xcodebuild以进行构建阶段。请务必引用设置名称和值,例如OTHER_LDFLAGS =“ - ObjC -lstdc ++” | |
| xcconfig | 使用额外的XCCONFIG文件来构建您的应用程序 | |
| suppress_xcode_output | 将xcodebuild的输出抑制为stdout。输出仍保存在buildlog_path中 | |
| disable_xcpretty | 禁用构建输出的xcpretty格式 | |
| xcpretty_test_format | 使用测试(RSpec样式)格式进行构建输出 | |
| xcpretty_formatter | 要使用的自定义xcpretty格式化程序 | |
| xcpretty_report_junit | 让xcpretty在提供的路径上创建一个JUnit样式的XML报告 | |
| xcpretty_report_html | 让xcpretty在提供的路径上创建一个简单的HTML报告 | |
| xcpretty_report_json | 让xcpretty在提供的路径上创建JSON编译数据库 | |
| analyze_build_time | 分析项目构建时间并将输出存储在’culprits.txt’文件中 | |
| xcpretty_utf | 报告构建时,xcpretty使用unicode编码 | |
| skip_profile_detection | 不要尝试从xcodeproj构建配置文件映射。应使用匹配或手动提供的映射 | false |
pem参数
| 键 | 描述 | 默认值 |
|---|---|---|
| development | 更新开发推送证书而不是生产证书 | false |
| generate_p12 | 另外为PEM文件生成p12文件 | true |
| active_days_limit | 如果当前证书的有效期少于此天数,则生成一个新证书 | 30 |
| force | 创建一个新的推送证书,即使当前的证书有效30天(或PEM_ACTIVE_DAYS_LIMIT)更多天 | false |
| save_private_key | 设置为保存私有RSA密钥 | true |
| app_identifier | 您应用的捆绑包标识符 | * |
| username | 您的Apple ID用户名 | * |
| team_id | 如果您在多个团队中,您的Developer Portal团队的ID | * |
| team_name | 如果您在多个团队中,您的Developer Portal团队的名称 | * |
| p12_password | 用于p12文件的密码 | ’’ |
| pem_name | 生成的.pem文件的文件名 | |
| output_path | 应存储所有证书和私钥的目录的路径 | . |
| new_profile | 如果有新的配置文件,则调用阻止 |